KwajZebra Tutorial
KwajZebra { General | Time | Fields | Functions | Movies }
Keeping Track of the Time Mode
This document defines the Zebra time modes, and trains the user to identify what time mode Zebra is using and what time the displayed data were taken.
Time Modes
- Real-time mode: Displays the most recent data in each enabled directory. In real-time mode, the reference time is set to the time that the most recent data file was obtained.
- History mode: Displays the most recent data from each enabled directory before a specified reference time. In history mode, the reference time is a constant that is arbitrarily set by the user.
- If the font color of the reference time is yellow, then Zebra is in history mode.
- The current time mode is displayed at the top of the "Data Available" menu (for information on the "Data Available" menu, see General Setup).
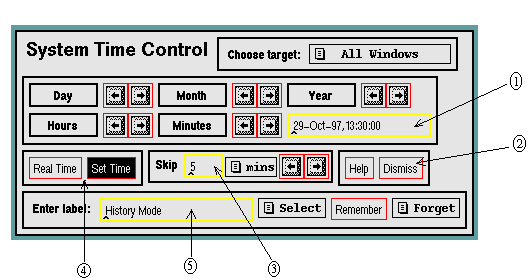
Fig. 1 contains a diagram of the time widget. In order to switch Zebra to real-time mode, use the mode selector to select "Real Time." Then, iconify the time widget or click on the "Dismiss" button to close the window. In order to switch to history mode, one needs to input a reference time first. This is done by either toggling the day, month, year, hours, and minutes arrows until the desired reference time is displayed and clicking "Set Time"; or by clicking on the reference time box, deleting the current box contents using the "backspace" key, and typing a new reference time (UTC) in the format DD-MMM-YY, HH:MM:SS. Once this is done, select "Set Time" to put Zebra in history mode.
Once in history mode, if one wishes to change to a different reference time, the above procedure can be repeated, or the "Skip" function can be used. To use the "Skip" function, input a time increment in the "Skip" box and select the desired units (hours, minutes, seconds, etc.) using the small pull-down menu to the right of the box. Then, by clicking the forward or backward arrows, the reference time is shifted by the given increment and the history time is automatically reset.

Fig. 1: Diagram of the Time widget, showing these five components: (1) the reference time (for history mode only), (2) the "Dismiss" button, (3) the "Skip" function, (4) the time mode selector, and (5) the mode display.
Overlay Times
Each time the display changes, the overlay times widget is automatically updated. Thus, keeping the overlay times window open during your KwajZebra session is highly recommended, as it will help eliminate confusion.

Fig. 2: The Overlay Times widget.
KwajZebra { General | Time | Fields | Functions | Movies }
Scientific
contact: Professor Sandra
Yuter, Project Science Coordinator